
React vs Svelte (Q3 2023)
” Any reasonable developer in today’s world would learn React because it’s the status quo and that’s where the jobs are, but life is a lot more fun when you become unreasonable and go against the status quo to push web development forward for future generations ”
- Fireship, June 30, 2023
In this discussion, we will explore and compare between React and Svelte, by examining their common patterns and design choices made by the framework creators.
I won’t be making a definitive judgment on which framework is superior, since it’s better to just leave the comment on the Fireship 🔥 YouTube channel.
1. Rendering
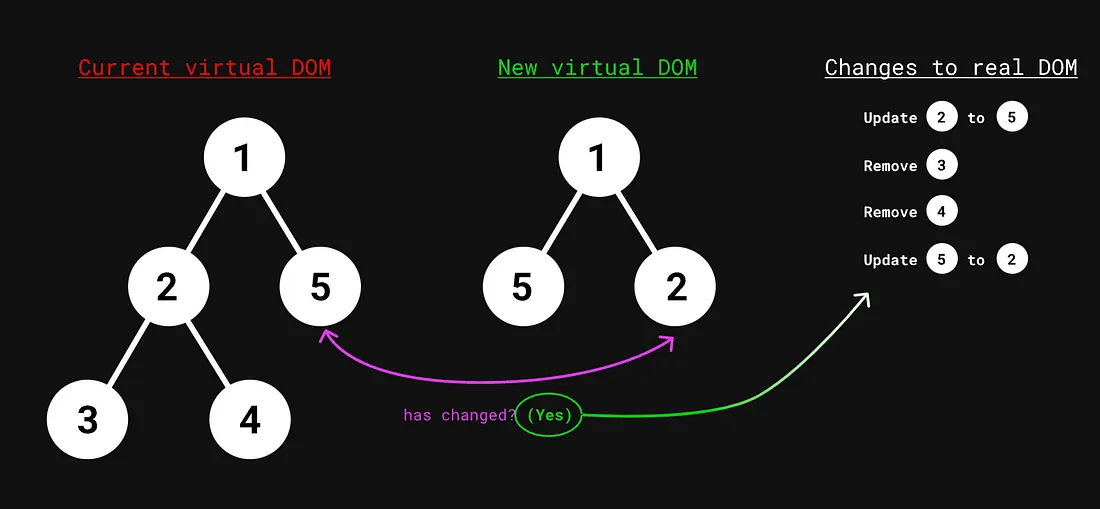
React.JS utilizes a runtime known as the Virtual DOM to monitor and track changes in application data. This allows React to update and render these changes in the actual DOM of the web browser.
The drawback is a certain amount of initial JavaScript code requirement. For example, in a framework like Next.JS, the baseline size is ~70 kilobytes, even for a simple “Hello World”.
Svelte takes a unique approach by using a compiler to transform your code into vanilla JavaScript, eliminating the need for a separate runtime. As a result, a basic “Hello World” in Svelte can be as small as ~3 kilobytes.
React Virtual DOM is SLOW, try Million.JS
2. State
An example of a simple Counter app implemented in both React and Svelte.
// App.jsx
import { useState } from "react";

function Counter() {
  const [count, setCount] = useState(0);

  return (
    <button onClick={() => setCount((c) => c + 1)}>Count is {count}</button>
  );
}

export default Counter;
In React, we create components using functions.
Inside these components, we can incorporate reactive state by utilizing the useState hook. This hook allows us to obtain a reactive value and a setter function, enabling us to update the state.
// App.svelte
<script>
  let count = 0;
</script>

<button on:click={() => count++}>
  Count is {count}
</button>
In Svelte, you work with a single component file.
The logic is defined within script tags, which simplifies the development process.
To create reactive state, simply declare a variable using the let keyword.
You can define a function that directly modifies the variable’s value upon a click event.
The beauty of Svelte lies in its concise syntax – no imports or function calls are needed to initialize the state. It feels like working with vanilla JavaScript, keeping things simple and efficient.
3. Props
In React, we pass props by defining them as function arguments, which are commonly destructured for convenience.
// App.jsx
function ColoredBox({ color }) {
  return (<p>You picked: {color});
}
In Svelte, you can pass variables from the outside, by simply using the export keyword in front of them.
// App.svelte
<script>
  export let color;
</script>

You picked: {color}
4. Children
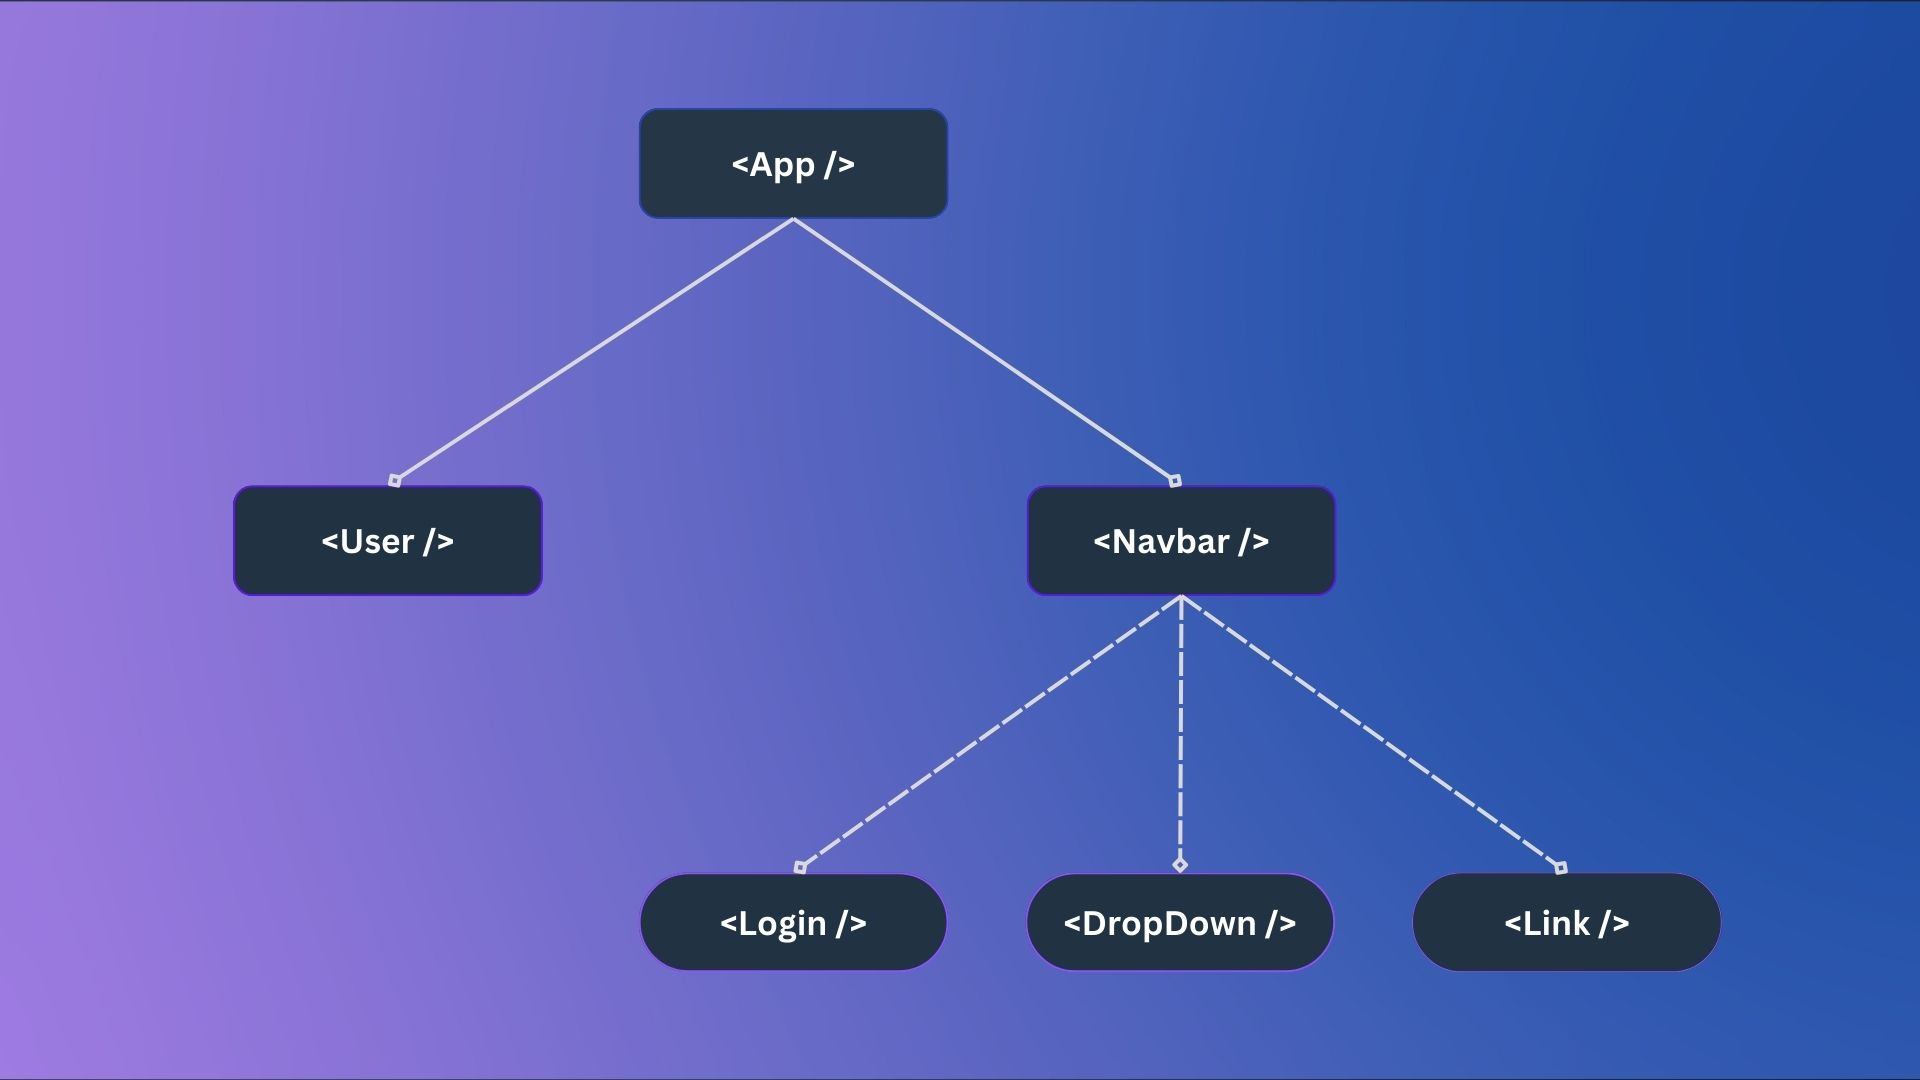
In React, we have the ability to pass components as props and render them directly within the JSX code.
// App.jsx
function NavBar(props) {
  return <nav>{props.children}</nav>;
}
Additionally, if we need to insert UI content inside a component, we can utilize the built-in props.children value.
<Navbar>
  <a href="/">Hi, mom!</a>
  <a href="/heaven">Hi, dad!</a>
</Navbar>
In Svelte, there is a distinct system called slots.
The default <slot /> element in Svelte is equivalent to the usage of {props.children} in React.
// App.svelte
<slot name="header" />
<slot />
<slot name="footer" />
In addition, Svelte provides the capability to create named slots, enabling the insertion of UI at specific locations within the markup of the component.
5. Lifecycle
In React, we have the useEffect hook, which accepts a callback function as its first argument.
By providing an empty array as the second argument, we indicate that the effect should only run once and has no dependencies on specific data.
// App.jsx
function Navbar() {
  useEffect(() => {
    const test = async () => {
      // Handle promise
    };
    test();
  }, []);
}
In Svelte, we can achieve a similar pattern using the onMount function.
Not only is it more readable, but it also has the advantage of being able to handle async functions, which is not directly supported in React.
This means that in React, you would need to define a separate async function outside of the main callback, creating more complexity.
// App.svelte
<script>
  onMount(async () =>{" "}
  {
    // Handle promise
  }
  );
</script>
6. Side Effects
In React, we can create a side effect using the useEffect hook.
By specifying the count variable in the dependencies array, we can make it update the document title whenever the count changes.
// App.jsx
function Counter() {
  const [count, setCount] = useState(0);

  useEffect(() => {
    document.title = `Count is ${count}`;
  }, []);
}
In Svelte, we utilize a distinct mechanism known as reactive declarations.
It uses the $: syntax, which triggers the code to re-run whenever there are changes in any of the dependent data.
// App.svelte
<script>
  let count;

  $: document.title = `Count is ${count}`;
</script>
In the above code, the Svelte compiler recognizes the dependency on the count value.
It automatically updates the document.title whenever the count value changes.
In React, it's common to mistakenly configure the dependencies array, leading to unexpected results that can be challenging to debug.
This approach in Svelte is not only more concise, but it also tends to be more reliable.
7. Computed State
In React, you can easily achieve computed state by defining a variable that depends on some state.
However, the code will run every time the component is re-rendered, which can impact performance.
// App.jsx
function Counter() {
  const [count, setCount] = useState(0);

  const doubled = count * 2;

  useEffect(() => {
    document.title = `Count is ${count}`;
  }. [count]);
}
To optimize the computational power in React, it is recommended to wrap the code that computes state with useMemo.
By explicitly specifying the dependencies, React can cache or memorize the computed value between renders.
// App.jsx
function Counter() {
  const [count, setCount] = useState(0);

  const doubled = useMemo(() => count * 2);

  useEffect(() => {
    document.title = `Count is ${count}`;
  }. [count]);
}
In Svelte, there’s no need to explicitly use memoization techniques like in React. By utilizing the same reactive declaration, we can define a new variable.
<!-- App.svelte -->
<script>
let count;

$: doubled = count * 2;
$: document.title = `Count is ${count}`
</script>
Svelte automatically understands that this code should only run when the count changes. This streamlined approach eliminates the need to explicitly handle memoization.
8. Conditional Logic
In React, using an if statement directly within a function component is not possible. Since a function component must return a JavaScript expression representing a single value, we can utilize a ternary operator to represent basic if-else conditions.
This allows us to condense the logic into a single line of code.
// App.jsx
function Counter() {
  const [count, setCount] = useState(0);

  return <>{count > 100 ? <p>Big</p> : <p>Medium</p>}</>;
}
Svelte, leveraging its compiler, offers the flexibility to incorporate various templating features. This includes the ability to create if-else statements directly within the HTML code, similar to traditional JavaScript syntax.
Although, it may require slightly more code, but this approach enhances readability and clarity in Svelte templates.
// App.svelte
<script>
  let count = 0;
</script>

{#if count > 100}
  <p>Big</p>
{:else}
  <p>Medium</p>
{/if}
The advantage of readability becomes even more evident when dealing with complex conditions, such as an if - else if statement.
// App.jsx
function Counter() {
  const [count, setCount] = useState(0);

  return (
    <>{count > 100 ? <p>Big</p> : count > 50 ? <p>Medium</p> : <p>Small</p>}</>
  );
}
In React, it is common to encounter nested ternary operators, resulting in code that can become difficult to maintain.
// App.svelte
<script>
  let count = 0;
</script>

{#if count > 100}
  <p>Big</p>
{:else if count > 500}
  <p>Medium</p>
{:else}
  <p>Small</p>
{/if}
Comparing to Svelte.
9. Loops
In React, the most common approach for iterating and rendering a list is to use the map function on an array.
To optimize the list rendering performance, it is recommended to assign a unique key prop to each child component within the loop.
// App.jsx
function Counter() {
  const items = [
    { id: 1, name: "foo" },
    { id: 2, name: "bar" },
    { id: 3, name: "baz" },
  ];

  return (
    <>
      {items.map((item) => {
        <div key={item.id}>{item.name}</div>;
      })}
    </>
  );
}
In Svelte, we can loop over an array of data using the each block. It creates a template variable for each item, enabling us to access its data within the tags.
<script>
  const items = [
    { id: 1, name: "foo" },
    { id: 2, name: "bar" },
    { id: 3, name: "baz" },
  ]
</script>

{#each items as item {item.id}}
  <p>{item.name}</p>
{/each}
To make it a keyed loop, we can specify the key value inside parentheses within the each block, ensuring efficient rendering and updates.
10. Shared State
In React, there is no built-in primitive mechanism to easily share a single reactive value across the entire component tree.
Typically, we need to bring in a state management solution like Redux, MobX, or Jotai.
In the case of Jotai, we can create an atom to represent a value.
// Jotai
import { atom } from "jotai";

export const countAtom = atom(0);
Then, we can utilize the useAtom hook to access that value.
This approach allows us to use shared state across multiple locations by decoupling it from individual components.
// App.jsx
import { useAtom } from "jotai";
import { countAtom } from "./atom";

function Counter() {
  const [count, setCount] = useAtom(countAtom);

  return (
    <>
      <button onClick={() => setCount((c) => c + 1)}>Count is {count}</button>
    </>
  );
}
On the contrary, Svelte offers a built-in mechanism called stores.
stores bears resemblance to observables in libraries such as RX.JS.
In Svelte, we can create a writable store to represent a value.
// store.js
import { writable } from "svelte/store";

export const countStore = writable(0);
We can subscribe to the value of that store within any component, whether it’s in the templates or in the JavaScript code.
To achieve this, we simply prepend the $ in front of the store name.
// App.svelte
<script>
  import { countStore } from "./store";
</script>

<button on:click={() => countStore.update(c => c + 1)}>
  Count is {$countStore}
</button>
Additionally, it automatically handles the task of unsubscribing from data when there are no more listeners, which can be crucial when working with real-time data sources like Firestore.
" As a Svelte user myself, I can't even begin to tell you how much complexity and code this one little mechanism will eliminate from your code base it allows you to use reactive data throughout the entire application with surgical precision and zero boilerplate.
Thanks to the magic of Svelte compiler. "
- Fireship, June 30, 2023
11. Promises
React introduces a new experimental hook called use which allows unwrapping promises directly within a component.
It functions similarly to the await keyword, resolving the promise value into a variable.
However, it’s also important to handle loading states and potential errors.
One approach is to wrap the component with Suspense, which displays a loading spinner as a fallback while the promise is being resolved. Additionally, the entire setup can be enclosed within an error boundary to handle and display an error page if the promise is rejected.
This code may appear intimidating and requires a deep understanding of React to comprehend its functionality.
// App.jsx
function ComponentWithAsyncData() {
  const number = use(Promise.resolve(100));

  return (
    <p>{number}</p>
  );
}

function App() {
  return {
    <ErrorBoundary fallback={<ErrorPage />}>
      <Suspense fallback={<LoadindSpinner />}>
        <ComponentWithAsyncData />
      </Suspense>
    </ErrorBoundary>
  }
}
In Svelte, we have the capability to directly unwrap promises within a template using the await keyword.
While awaiting the resolution of the promise, a loading spinner can be displayed. Once the promise resolves, the main UI is shown.
// App.svelte
<script>
  import { LoadingSpinner, ErrorPage } from "$components";

  const promise = Promise.resolve(100);
</script>

{#await promise}
  <LoadingSpinner />
{:then number}
  <p>The number is {number}</p>
{:catch error}
  <ErrorPage {error} />
{/await}
Conversely, if there is an error, the error UI is displayed.
This approach is easily understandable for JavaScript developers familiar with promises.
Don’t forget to show some love and support! 🔥

Thank you to Fireship for providing the valuable information used in this blog post.
Check out Fireship.io for more amazing content and resources. 👇